Showing posts with label flour. Show all posts

Sunday, October 6, 2013

Lumberjack Cake

I saw this recipe in a magazine a couple of years ago and I ripped it out and have magically held onto it all this time. (If you know how many places I've lived, you know that this is a miracle.)

I have tried to figure out why they call it Lumberjack Cake. No one in the world seems to know. No one. So I'm just going to assume that its called Lumberjack Cake because lumberjacks really like delicious foods and this cake is a heavenly piece of gooey perfection. Richard is, apparently, not a lumberjack. He thought this cake was a little too gooey. But I think if you love German Chocolate cake, then you'll love this. Coconutty, gooey tastiness.


A disclaimer: I was not trying to be all Betty Crocker by grating fresh coconut. I would have gone straight for the bagged, shredded coconut but the store was out. However, a very helpful clerk told me "Why don't you grate it yourself? We got fresh coconut." As if that's just something you do every day. 

1 cup chopped, pitted dates
1 tsp baking soda
1 1/4 cups all purpose flour
3/4 tsp baking powder
1/4 tsp salt
1/2 cup butter, softened
1 1/4 cups granulated sugar
1 egg
1 tsp. vanilla extract (I substituted coffee liquer and it was great!)
1 apple, peeled, cored, diced
1/2 cup shredded coconut


Preheat oven to 350 degrees. Grease a 9 inch springform pan; line the bottom with parchment paper.


In a small saucepan bring dates and 1 cup of water to a boil. Stir in baking soda; set aside and allow to cool.


In a small bowl, stir together flour, baking powder, salt.

In a large bowl or standing mixer, beat butter, sugar, egg and vanilla on medium speed . Slowly beat in date mixture until combined. Add flour mixture gradually until just combined.

Gently fold in apple and coconut.

Spread mixture evenly into prepared pan. Bake for 45-50 minutes or until wooden toothpick inserted in center comes out clean.

Cool on wire rack. Gently remove sides of pan and then parchment paper.

Wednesday, March 27, 2013

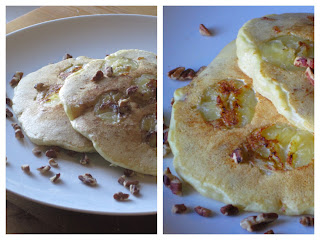
Banana Pecan Soycakes

I like dairy. I like it a lot. Butter, milk, cheese. Bring it on! But some of my dearest friends have sensitivities to dairy and I've had many requests for a dairy-free breakfast option. Well my friends, this is it!

These fluffy delights are full of chopped pecans and caramelized banana slices.

 
1 cup All Purpose Flour
2 tbsp. Sugar
2 tsp. Baking Powder
1/2 tsp. Salt
1 cup Soy Milk
2 tbsp. Olive Oil
1 Large Egg
1/2 cup Chopped Pecans
1 Large Banana, sliced thin
Additional sugar
 
Heat griddle or skillet over medium heat.
 
In a small bowl combine flour, sugar, salt and baking powder. In a large bowl whisk together egg, milk and oil.
 
Add flour mixture and mix until just moistened. (There should be a few lumps.) Stir in pecans and let the batter rest 5 minutes.
 
Sprinkle banana slices with additional sugar and place 4-5 slices close together on the griddle for each pancake. Pour about 1/3 cup of batter over each group of bananas on griddle. Cook for about 3 minutes or until sides of the pancake look cooked and the tops are bubbly. Place 4-5 slices on top of each pancake before flipping. Cook for about 2 more minutes.
 
Makes 6 pancakes. It's time to eat!


Saturday, March 2, 2013

10 Tips for a Happy Kitchen

The kitchen can be a scary/frustrating/annoying/confusing place. And there are some tasks that make the kitchen even more daunting. Here are some tips that just might help make your kitchen experience more palatable. :)


1. Got a piece of eggshell in that egg you just cracked open? Don't go fishing for it with dry fingers. The oils in your skin push the proteins in the egg and force the shell away from your finger. Try wetting your finger and then picking out the shell. The water allows the proteins to move apart, allowing you to get to the shell right away.


2. Need to thaw meat fast? Try putting it in an unheated aluminum or stainless steel pan. The metal will work as a conductor, lowering the temperature. Flip the meat after about 30 minutes to let the other side get some surface contact.


3.  Commercially made peanut butters contain additional oils and preservatives. Save up to 100 calories by making your own. Put nuts in a food processor and process until smooth. That's it!

4. You may not know it, but most cookbook measurements are based on spooning, not scooping the flour. When you scoop the flour gets packed into parts of the measuring cup and you'll end up with more flour than you need.

5. You know why chefs look like they've got it together in the kitchen? They prep. It's called mise en place, which translates to "everything in place". You'll save time and feel more confident as you move through your recipe.

6. Salt does more than just make things taste salty. Salting at the right time will enhance the flavor of every dish. For tips on salting, click here.

7. Asparagus can have a tough skin. Peel it off just below the tips before cooking and your asparagus will be nice and tender.

8. Reserve some of the water used to cook your pasta. The starch in the water will thicken your sauce and add a creaminess to the texture.

9. Sanitize your wood cutting boards by covering them in salt and scrubbing with a lemon. As an added bonus, the salt enhances the smell of lemon. Your kitchen will smell amazing!

10. Use unflavored, waxed dental floss to gently slice delicate pastry doughs. Your rolls will keep their shape and you'll keep your sanity.

Got a tip you want to share? How do you make cooking easier?


Saturday, February 16, 2013

Peanut butter swirl brownies

The thing I love about baking is that it is all about science. With cooking, there is an artist element that I just can't always be bothered to deal with. But baking is like a delicious math problem. As long as you have all of the primary numbers in place your answer will always be right.

After a particularly trying day at work this week, I came home and went straight to the kitchen. All I wanted was the peaceful assurance that only baking can bring. The deliberate measuring of ingredients, the soft scrape of a spatula stirring melting chocolate, the zen feeling of accomplishment when a warm and inviting smell wafts out of the oven. But I didn't want to be baking for hours. Just a quickie to unwind. So I whipped up these bits of perfection. About 30 minutes of prep and 35 minutes in the oven and that's all it took!


You'll need:
7 ounces semisweet chocolate chips
6.5 tablespoons unsalted butter
1/2 cup plus 1 tablespoon granulated sugar
2 tablespoons water
2 large eggs
3/4 cup flour
1/4 teaspoon baking soda
1/4 teaspoon salt
1/3 cup honey roasted peanut butter (freshly ground if possible)

Preheat oven to 350 degrees. Lightly grease an 8x8 inch square baking dish. Line dish with aluminum foil, allowing the foil to hang over the edges by about 2 inches and lightly grease the foil. (Why am I doing this?)

In a large saucepan over medium heat, bring butter, sugar, and water to a boil, stirring. Remove from heat and stir chocolate chips into the sugar mixture until completely melted. Let cool to warm. Stir in eggs until well blended.

In a small bowl thoroughly mix together flour, baking soda and salt. Add the flour mixture to the chocolate mixture and stir until just combined.

Pour batter into baking dish and spread batter to edges. Drop small bits of peanut butter on top of the batter and use two toothpicks to swirl the peanut butter through the batter.

Bake in the middle of the oven for 35 minutes or until toothpick inserted in the middle comes out clean. Cool on a wire rack.


Sunday, September 4, 2011

Pancakes!

Pancakes are a Sunday breakfast staple. A perfect pancake can really make you feel like a kid again. When you forget all of your grown up manners and use your fingers to swipe the last piece across a golden pool of syrup; that's pure joy. And making pancakes from scratch requires just as little effort as making them from a mix and they'll taste better!

For a long time, I hated making pancakes. Mostly because I am a perfectionist in the kitchen and I could not get them to look 'pretty' and have a fluffy texture. After much perseverance, and many failed experiments, I have a deep respect for a good pancake.

The secret lies in the flour. Many people aren't exactly clear on the differences between bleached and unbleached flour. Over time, flour naturally bleaches to white and develops a finer, softer texture and helps with the development of gluten. But nowadays, manufacturers are not interested in waiting 6 months for this process.

Manufacturers use bleaching agents to achieve this process in weeks instead of months. Products like benzoyl peroxide, calcium peroxide and chlorine are the most commonly used. For those with a delicate palate, a slightly bitter aftertaste can be detected in products made with chemically bleached flours. And even if you don't have a very sensitive palate, try eating foods made with unbleached flour for a month or so and then switch back. You will taste the difference.

Today's pancake recipe uses a blend of whole wheat flour and unbleached flour. These bad boys have a light, airy texture and are high in protein (as flour processing affects protein levels). And one of these pancakes has about as many calories as a bowl of Special K cereal (about 110 calories). Enjoy!

A few tips before you get started:
  • Heat your griddle or skillet to 375 degrees for ten minutes before you begin to cook. (If you put a drop of water on the griddle and it begins to jump around, you've got it right).
  • If you are not using a non-stick or well seasoned griddle, you can lightly grease your cooking surface with a teeny tiny bit of butter. (If you use too much, you will get a chewy crust on your pancake.)
  • Make your batter in a large measuring cup so you can pour it right onto your cooking surface.
Now go make pancakes!

Light, Fluffy Pancakes

Ingredients

1 large egg
1/2 cup whole wheat flour
1/2 cup unbleached flour
1 cup buttermilk (See Ingredient Substitutions page for alternatives)
1 tablespoon granulated sugar
2 tablespoons vegetable oil
2 teaspoons baking powder
1/4 teaspoon salt
1/4 tsp cinnamon

In a large bowl, beat egg until fluffy (foamy). In a separate bowl, combine all dry ingredients. Add all dry and wet ingredients to the egg and whisk together. If you would like to add nuts, berries or chocolate chips, this is the time to do it. Let the batter rest for about three minutes.

Pour about 1/4 cup of batter for each pancake. As soon as bubbles form across the top of the pancake and the edges begin to cook, use a large spatula to flip. One side will always brown better than the other.

Serve immediately with warmed syrup.